
Making Tic-Tac-Toe in ANSI C
Some time ago I made a tutorial on creating Pong in C. There was a lot of interest in that topic and I was surprised to see the amount of people wanting to learn to make games in plain C without the plus plus. This is why I decided to extend that knowledge and create a second game in C using raylib. This time this game is tic-tac-toe. I also wanted to give more examples for the game ideas that I gave you some time ago.
Table of Contents
Setting up the project
Per usual I like CMake for project setup as it is the most popular build configuration tool. It will allow you to follow this tutorial on any device.
If you’ve read my pong example you would remember that we were using raylib. Raylib is a library that allows you to create graphics and audio easily in your game. Raylib is very popular and is also very easy to use. This time compared to the Pong example I will actually make the raylib dependency as a local one. The project sturcutre will be the following:
- packages
- raylib
- CMakeLists.txt 1
- tictactoe
- src
- main.c
- CMakeLists.txt 2
- src
- CMakeLists.txt 3
Now I’ve cloned the raylib repository inside packages/raylib. You can do that through git or you can go to raylib’s github repository and take a zip file. I use the 4.5.0 version in this tutorial. So download the same version and put extract the repository contents in the “packages/raylib” directory.
Now that this is done let’s look at the first CMake lists file in the packages folder. For it to work we write the following code:
project(packages LANGUAGES C)

add_library(${PROJECT_NAME} INTERFACE)

add_subdirectory(raylib)
target_link_libraries(${PROJECT_NAME} INTERFACE raylib)
This will allow us to abstract away any packages we’re going to use. For this tutorial it is only raylib. The next one we’re going to look is the one inside our own project folder called tictactoe:
project(tictactoe LANGUAGES C)


add_executable(${PROJECT_NAME} src/main.c)

target_link_libraries(${PROJECT_NAME} PRIVATE packages)
We define our executable as a C language project and we add our main.c source file. We also link to the packages proejct from the packages subdirectory. And lastly we need to link those together. We do this in the root CMake lists file:
cmake_minimum_required(VERSION 3.19)
project(tictactoe LANGUAGES C)

set(CMAKE_C_STANDARD 17)

add_subdirectory(packages)
add_subdirectory(tictactoe)
We also set the latest standard for C which is C17 by the writing of this article. As you can see our CMake setup is not that complicated. If you find this hard to setup check out my beginner article on how to install and use CMake. You can also enroll for my CMake course to learn how to handle more complicated CMake setups.
If you want to test out the pipeline and build this – simply add the following code in your main.c file:
#include <stdio.h>

int main() {
  printf("Hello, World!");
  return 0;
}
To build and run this later simply open up a terminal in this folder and run the commands cmake -S . -B ./build and then cmake --build ./build. You will then find your executable in build/tictactoe/tictactoe.exe.
Writing the game code
Now that our raylib based project is set up we can go on with creating our own game code of the tic-tac-toe game. This will be both creating the graphics and coding the game logic. I will be following google styling as much as possible and will also be splitting thing into functions.
Initializing a window
To initialize our window we will create a new funciton in our source file called InitializeWindow. It will contain the following code:
#include <raylib.h>
#include <stdint.h> // for types like uint8_t

void InitializeWindow() {
  const uint16_t kWindowWidth = 800;
  const uint16_t kWindowHeight = 600;

  InitWindow(kWindowWidth, kWindowHeight, "Tic-Tac-Toe");
  SetTargetFPS(60);
}
This will initialize a window with a width of 800px and a height of 600px. The title will be set to “Tic-Tac-Toe”. We also need to call this in our main function:
// includes & InitializeWindow ...

int main() {
  InitializeWindow();

  CloseWindow();
  return 0;
}
Between the initialize and Close window we also need to put up a loop so that the program doesn’t exit immediately. We want the game to close when the X on the window was pressed. To do so we introduce a new function called Run:
// includes & InitializeWindow ...

void Run() {
  while (!WindowShouldClose()) {
    BeginDrawing();
    ClearBackground(RAYWHITE);

    EndDrawing();
  }
}

int main() {
  InitializeWindow();
  Run();
  CloseWindow();
  return 0;
}
And this completes our windowing. If you now build and run the project you would get an empty white window. If you press the close button on it it will close the application. This is everything needed for our game logic.
Game Logic
For our game to be played we need something to represent a board and something to represent a player. Well the board can easily be represented by a matrix of 3×3 coordinates of values. And the players can be represented by a character or a number. For this tutorial I will use uint8_t to represent both the player (or player id) and the values on the board for our Tic-Tac-Toe. The board will have a value of 0 if the square is empty, 1 for player one and 2 for player 2. So player values can be either 1 or 2.
For the board I introduce a struct and a few functions to act on this struct:
// Includes ...

const uint8_t kEmptyPlayer = 0;

typedef struct Board {
  uint8_t positions[3][3];
} Board;

Board ConstructBoard() {
  Board board;

  for (uint8_t x = 0; x < 3; x += 1) {
    for (uint8_t y = 0; y < 3; y += 1) {
      board.positions[x][y] = kEmptyPlayer ;
    }
  }

  return board;
}

/**
 * Checks whether a given player has won.
 * @param board The current game board
 * @param player The player we want to check for
 * @return True if that player wins on this board
 */
bool CheckPlayerWins(Board board, uint8_t player) {
  for (uint8_t i = 0; i < 3; i += 1) {
    // horizontals
    if (board.positions[i][0] == player
        && board.positions[i][1] == player
        && board.positions[i][2] == player) {
      return true;
    }

    // verticals
    if (board.positions[0][i] == player
        && board.positions[1][i] == player
        && board.positions[2][i] == player) {
      return true;
    }
  }

  // diagonal
  if (board.positions[0][0] == player
      && board.positions[1][1] == player
      && board.positions[2][2] == player) {
    return true;
  }

  // diagonal
  if (board.positions[2][0] == player
      && board.positions[1][1] == player
      && board.positions[0][2] == player) {
    return true;
  }

  return false;
}

/**
 * @param board The current game board
 * @return True if the board is full (meaning no 0 values on it)
 */
bool BoardIsFull(Board board) {
  for (uint8_t x = 0; x < 3; x += 1) {
    for (uint8_t y = 0; y < 3; y += 1) {
      if (board.positions[x][y] == kEmptyPlayer) {
        return false;
      }
    }
  }

  return true;
}

uint8_t NextPlayer(uint8_t current_player) {
  return current_player == 2 ? 1 : 2;
}

// Window initialization, Run, main...
I will go through those functions quickly:
ConstructBoard– will create a new value for the Board struct type with empty fields for the board values.CheckPlayerWins– will check the horizontals, verticals and diagonals for a given player value. If that value is present in a line it will return true because that player would win considering that board.BoardIsFull– will check if there is no longer any empty space on the board. This is useful for determening a draw.NextPlayer– is more of an utility function that swaps the player value between 1 and 2.
Next thing we need is to draw those squares on the screen and update the board accordingly. To do this we have the following functions:
// Includes & Board functions before that...

/**
 * Draws the square on the screen as well as its current value.
 * Will also check if the square has been clicked
 *
 * @return True if the square has been clicked and is active
 */
bool UpdateSquare(uint8_t x, uint8_t y, uint8_t current_value) {
  const uint16_t square_size = 60;
  const uint16_t offset_x = (GetScreenWidth() - square_size * 3) / 2;
  const uint16_t offset_y = (GetScreenHeight() - square_size * 3) / 2;

  uint16_t position_x = offset_x + x * square_size;
  uint16_t position_y = offset_y + y * square_size;

  DrawRectangleLines(position_x, position_y, square_size, square_size, BLACK);

  if (current_value == 1) {
    DrawText("x", position_x + 20, position_y + 10, square_size - 20, BLACK);
  } else if (current_value == 2) {
    DrawText("o", position_x + 20, position_y + 10, square_size - 20, BLACK);
  } else if (IsMouseButtonPressed(MOUSE_BUTTON_LEFT)) {
    Vector2 mouse_position = GetMousePosition();
    if (mouse_position.x > position_x
        && mouse_position.x < position_x + square_size
        && mouse_position.y > position_y
        && mouse_position.y < position_y + square_size) {
      return true;
    }
  }

  return false;
}

/**
 * Draws the board and if a square has been clicked
 * the value will be updated for that square and the players will be switched.
 */
void UpdateBoard(Board *board, uint8_t *current_player) {
  for (uint8_t x = 0; x < 3; x += 1) {
    for (uint8_t y = 0; y < 3; y += 1) {
      if (UpdateSquare(x, y, board->positions[x][y])) {
        board->positions[x][y] = *current_player;
        *current_player = NextPlayer(*current_player);
      }
    }
  }
}

// Window Initialization, Run and main after that ...
Let’s explain these functions. The UpdateSquare function will first determine where the square should be placed. I have written a few calculations to draw the grid in the square based on its board x and y coordinate in the center of the window. I do this by getting the window width and the square size and calculating the offset on the left and top and then drawing a square with a width and height of 60px. Next we need to check if there is a current value and if it is 1 we draw an X or O if it is equal to 2. If it doesn’t match 1 or 2 we will check if the mouse was pressed and if it was we will check if the mouse coordinate is inside the square. In that case we return true to indicate that the square is empty and was pressed. The UpdateBoard function then takes a pointer to the current board and a pointer to the current player and goes through the squares to update them. If any square returns that it has been clicked the board will update that value to the current_player and then switch the current_player.
The last thing to do is to update our Run function to now work with this logic:
// Updated Run
void Run() {
uint8_t current_player = NextPlayer(0);
Board board = ConstructBoard();
char *won_message = "";
while (!WindowShouldClose()) {
BeginDrawing();
ClearBackground(RAYWHITE);
UpdateBoard(&board, ¤t_player);
if (CheckPlayerWins(board, 1)) {
board = ConstructBoard();
won_message = "Player 'x' won!";
}
if (CheckPlayerWins(board, 2)) {
board = ConstructBoard();
won_message = "Player 'o' won!";
}
if (BoardIsFull(board)) {
board = ConstructBoard();
won_message = "Game was a draw!";
}
DrawText(TextFormat("Current Player %c", current_player == 1 ? 'x' : 'o'), 25, 10, 40, BLACK);
DrawText(won_message, 25, 60, 40, BLACK);
EndDrawing();
}
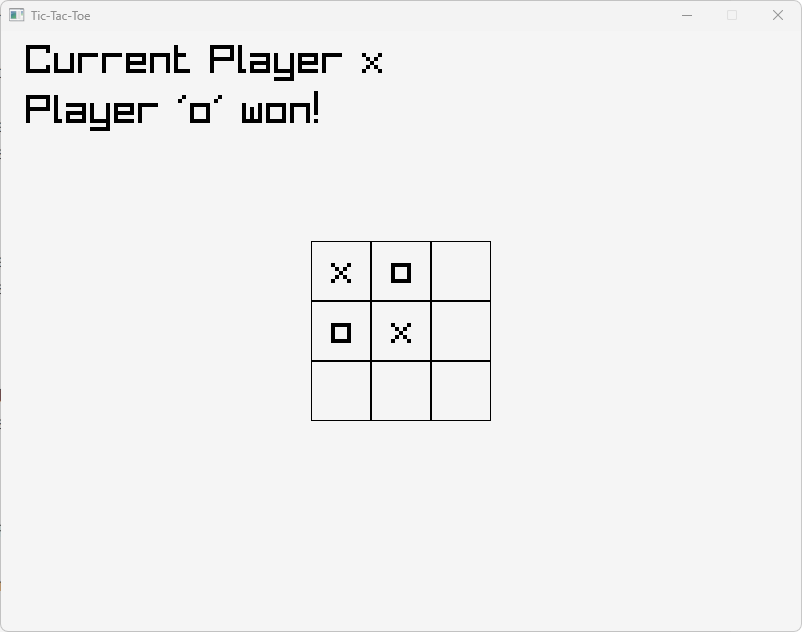
}Here we included a board and a current player variables before the loop. Then inside the loop first we update the board where we will handle clicking and switching player turns. Then we check wether any player wins the game or if it is a draw and construct a new board. We also show a message for who won the last game since it will clear the board and we show a message whose turn it is.
The end result after building and running this code is the following:
Conclusion
Well this is another tutorial of the type of basic games in C. This type of practice helps you develop low-level programming skills so don’t stop learning. You can check other tutorials on this site on how to develop with C or C++ and if you like the content don’t forget to subscribe to the newsletter.
The code for this article you can find in the following gist.
Leave a comment