Godot Native using CMake
Godot is one of the top engines by popularity and usage. It is also completely free without any hidden cost. The one thing that mostly stops me from developing in Godot was that I don’t like the idea of the provided GDScript language. This is mostly a personal preference but I love static languages. Also writing code in GDScript made me feel more like a modder or a designer and less like the programmer that I am. This is why in this article I will explore how to create a project and use Godot Native to power up the scripts.
Table of Contents
Why GDNative
In this article, I will present to you how you can develop in Godot using fully featured C++ code. I will do that by utilizing the power of Godot Native (or GDNative). I will also set up the projects using CMake for cross-platform compilation. You can learn more about how to compile and work with CMake in this blog.
I like C++ but developing a custom engine is a long and a continious process. If you still want to create games using C++ as your favourite language you can usually go for a bunch of frameworks or Unreal. Frameworks though just provide a solid foundation and you still have to extend them to create your own tools. Unreal Engine on the other hand doesn’t provide good 2D tooling and for 3D it may be an overkill of an engine for a small indie project.
Here comes Godot Native code. Godot is a perfect lightweight engine for small projects. The good news is that you can still bring the full power of C++ to it and develop your game that way. GDNative is more verbose though and will require you to write additional code to register classes, properties, and functions. This is not present in the built-in GDScript. You will also have to compile your project for every platform that you want to ship to. Of course, CMake will take care of most of the heavy lifting in this regard.
Project setup
Setting up the project will be similar to how I set up every other project in CMake. You will find some articles in this blog on how to set it up and how to manage dependencies. The difference here is that we would like to make have our library under some Godot project. Even if you are developing to later distribute a library and not build a Godot Native powered game – you would benefit from testing directly and not copy DLLs on every compilation. For the sake of the example, I will call my project MyLibrary. The project structure initially should look something like this:
- MyLibrary
- godot-cpp
- … godot headers …
- MyLibrary
- src
- … source files …
- include
- … header files …
- CMakeLists.txt
- src
- CMakeLists.txt
- godot-cpp
- … Other Godot project files …
Creating a Godot project
To start I will open up my Godot executable. You can download Godot from the official engine site: https://godotengine.org/download. On the project select screen, I select a new project, set a name, create a directory and click on create. After that, I minimize/close Godot for now. We will need it again at the end.

Next up I open up the newly created project directory and create a new folder underneath called MyLibrary. The first thing I want to do is to create an empty “.gdignore” file in this newly created folder. This file will prevent Godot from trying to import files from this folder into the project. This folder will be strictly for building the C++ shared libraries so I am currently OK with that.
Godot headers
Next up I would like to download https://github.com/godotengine/godot-cpp this project and put it into a folder: “GDProject/MyLibrary/godot-cpp”. This can be done in a few ways and I will let you pick your preferred way of doing that – download zip, git clone, git submodule, git subtree, etc.
This godot-cpp project will provide you with some headers and registration functions that you will need to create the bond between Godot and your native library. We will add the godot-cpp project by listing it as a subdirectory in CMake.
There is also the alternative approach to add a custom target (add_custom_target) and use the SConstruct build system for godot-cpp. Godot prefers SConstruct as the developers consider it a “real” scripting language for defining your builds instead of CMake. I don’t personally care too much I just use what is convenient for me. You can do this by checking out how to build godot-cpp files using SCons and adding the commands as COMMAND on your custom target. You will have to also find and reference the include directories and library for linking in your project.
Note: at the time of writing of this article there was a bug with godot-cpp on the CMake front for Windows. I submitted a pull request but it was not yet approved. You can apply the fix from that commit or look up if the issue wasn’t resolved for you. https://github.com/godotengine/godot-cpp/pull/536
CMake setup
Next we need to create our core CMakeLists.txt file. It will be located under “GDProject/MyLibrary/CMakeLists.txt” and will contain the following:
cmake_minimum_required(VERSION 3.17)
project(MyLibrary)

option(ARCHITECTURE "x64 or x86 CPU Architecture" "x64")

set(CMAKE_RUNTIME_OUTPUT_DIRECTORY "${CMAKE_CURRENT_SOURCE_DIR}/${CMAKE_BUILD_TYPE}/${ARCHITECTURE}")
set(CMAKE_CXX_STANDARD 17) # Feel free to use whatever standard you want

add_subdirectory(godot-cpp)
add_subdirectory(MyLibrary)
There isn’t a reliable way to get the architecture we are building for. On Windows, some compilers may return x64 even when building for an x32 application. This is why we add the option for the architecture. We also want to output all the library files in a more convenient directory, so we set the CMAKE_RUNTIME_OUTPUT_DIRECTORY.
Simple enough we would also add another folder named MyLibrary under MyLibrary where we would keep our source files. There will be another CMakeLists.txt there which will define our target (GDProject/MyLibrary/MyLibrary/CMakeLists.txt):
project(MyLibrary CXX)

add_library(MyLibrary SHARED
            src/GodotLibrary.cpp
            include/Controller.h
            src/Controller.cpp
            )

target_link_libraries(MyLibrary PUBLIC godot-cpp)

target_include_directories(MyLibrary
                           PUBLIC
                           $<INSTALL_INTERFACE:include>
                           $<BUILD_INTERFACE:${CMAKE_CURRENT_SOURCE_DIR}/include>
                           PRIVATE
                           ${CMAKE_CURRENT_SOURCE_DIR}/src
                           )
We will be adding three files. GodotLibrary will be a source file that will register the newly written godot native module and classes with Godot. The other two are just an example class for a script controlling a sprite.
Creating the library
Let’s start with creating the controller. Some things are very similar to how they are done in GDScript but translated to their C++ equivalent. The main difference here is that you will have to manually declare your member fields and methods to Godot so that they are available in the node-inspector or to be used in signals. The declaration (header) file will look something similar to this:
#ifndef GDNATIVEEXPLORATION_CONTROLLER_H
#define GDNATIVEEXPLORATION_CONTROLLER_H

#include <Godot.hpp>
#include <KinematicBody2D.hpp>
#include <Input.hpp>

namespace godot {
    class Controller : public KinematicBody2D {
    private:

        // We need to register some information to Godot
        GODOT_CLASS(Controller, KinematicBody2D)
    public:
        static void _register_methods();
        void _init();
        void _process();

        Controller() {}
        ~Controller() {}


        // Member fields
        int speed = 200;
        Vector2 motion;


        // Member functions
        void UpdateMotionFromInput();
    };
}

#endif //GDNATIVEEXPLORATION_CONTROLLER_H
It is required from your class that will be used as a script to have the GODOT_CLASS macro, as well as the “_init” and “_register_methods” methods. The “_init” and “_register_methods” method will automatically be picked up by Godot.
You may recognize the “_init” and “_process” methods. You may actually call the _process method differently but it is advised that you keep the consistency with GDScript.
All the other member fields and methods you can define as you wish.
Next up is the implementation file for this class:
#include "Controller.h"

void godot::Controller::_init()
{
    motion = Vector2(0, 0);
}

void godot::Controller::_register_methods()
{
    register_method((char*)"_process", &Controller::_process);
    register_method((char*)"UpdateMotionFromInput", &Controller::UpdateMotionFromInput);
    register_property((char*)"speed", &Controller::speed, 200);
}

void godot::Controller::_process()
{
    UpdateMotionFromInput();
    move_and_slide(motion);
}

void godot::Controller::UpdateMotionFromInput()
{
    motion = Vector2(0, 0);
    Input* input = Input::get_singleton();

    if(input->is_action_pressed("ui_up")) {
        motion.y -= speed;
    }

    if(input->is_action_pressed("ui_down")) {
        motion.y += speed;
    }

    if(input->is_action_pressed("ui_left")) {
        motion.x -= speed;
    }

    if(input->is_action_pressed("ui_right")) {
        motion.x += speed;
    }
}
As I already mentioned the “_init” and “_register_methods” will be located and called automatically. For every other method, you have to register yourself in “_register_methods” using the provided “register_method” function. There you have to give it a name that will be available and callable in Godot and a function pointer for the function. Any member fields that you want to expose You also have to register using the “register_property” where you will provide a name and a pointer, but also a default value.
Other than that there is nothing more specific for C++ that is not available in GDScript. You can get the input singleton and then query if the action is pressed or not. You can also apply speed and use the inherited “move_and_slide” method from the “KinematicBody2D”.
The last part is setting up some mandatory configurations for your library. I’ve created a separate source file for that called “GodotLibrary.cpp”:
#include <Godot.hpp>
#include "Controller.h"

using namespace godot;

extern "C" void GDN_EXPORT godot_gdnative_init(godot_gdnative_init_options* o)
{
    Godot::gdnative_init(o);
}

extern "C" void GDN_EXPORT godot_gdnative_terminate(godot_gdnative_terminate_options* o)
{
    Godot::gdnative_terminate(o);
}

extern "C" void GDN_EXPORT godot_nativescript_init(void* handle)
{
    Godot::nativescript_init(handle);
    register_class<Controller>();
}
I’ve taken most of this from Godot’s official documentation and I didn’t delve deep into what they each do. Similarly how you have to define each method and public field in your class – you also have to register each class you want exposed to Godot using the register_class template function.
That is pretty much all of it for now. You just build your application and you should get your shared libraries starting from the root of your CMake project inside “/Debug/x64” or similar.
Binding with Godot
Next step is to setup and use our library in Godot. So we reopen our project and we need to create some assets to reflect our Godot Native scripts.
Creating a library interface
The first thing is we need to interface with our library. In Godot, you would have to create a resource in which you define your library shared files. You will use this resource later in GDNative scripts to tell them where to look for certain classes. So we locate the file system inspector, right-click in a folder that we want to put our library interface in. Keep in mind You cannot use MyLibrary as it is ignored. We need to create a new resource:

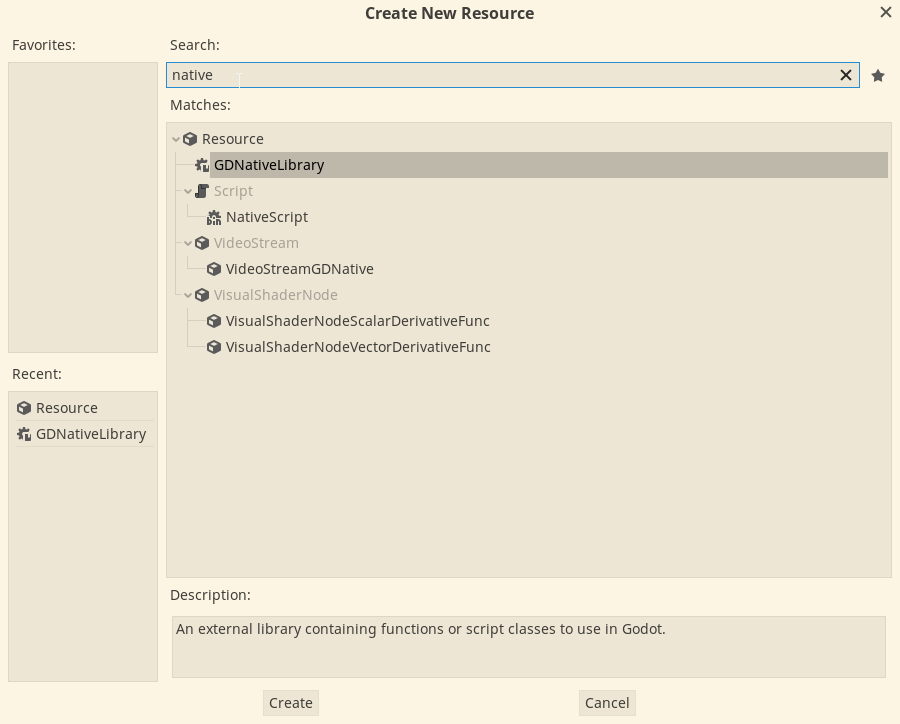
You will get a popup window to select the type of resource you are creating. Search for “GDNativeLibrary” and select it:
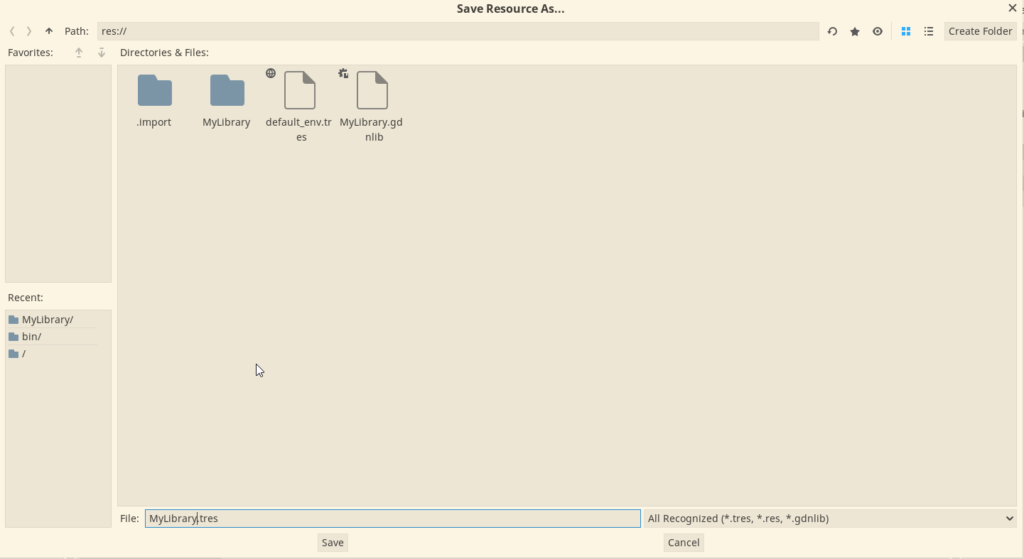
A new popup window will appear where we will choose a name for our interface file. I named it “MyLibrary.gdnlib” but you can use .tres as well for the extension.
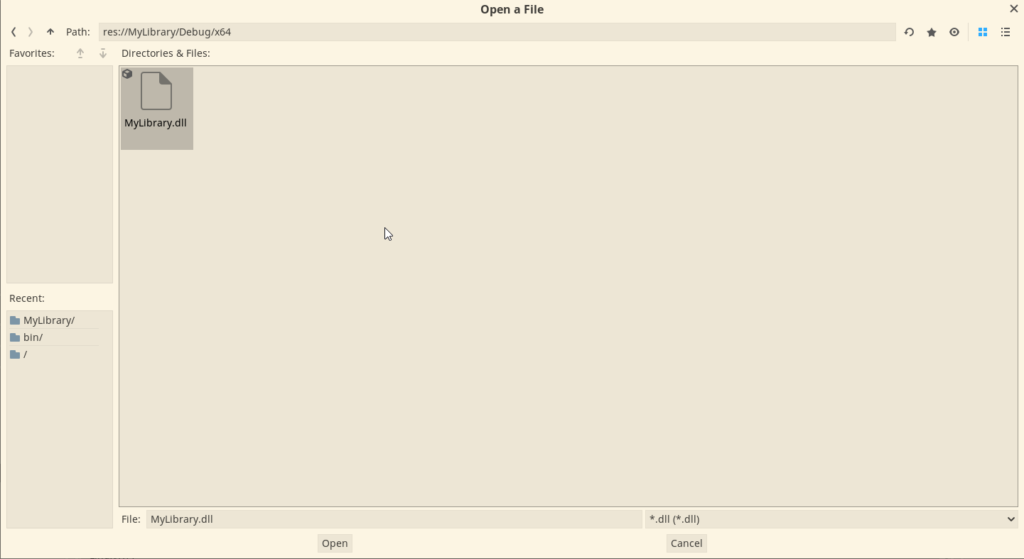
Next up we double click the newly created library file and it will open up a custom inspector on the bottom. I am using Windows so I locate the Windows section and click on the little folder icon in the middle to provide the path to the Windows DLL file:

It will open up a window for me so I go to the output directory for my build which is “res://MyLibrary/Debug/x64/MyLibrary.dll” and select it.
This concludes our library interface setups. If you want to provide more platforms you would have to build the relevant shared libraries for those platforms using CMake. I would suggest not ignore and always commit the output libraries in your source control system.
Creating a GDNative script
Next up is creating the data for our C++ script. This can be done by choosing a folder where we will keep the script in the file system browser in the engine. We right-click the folder and click on the create script option:

On the new popup window, we fill in the data. Inherits must be the same as it is in C++. The class name should be the same class name you defined in C++ too. The path or file name you can choose yourself. Also, make sure to uncheck “built-in script”.
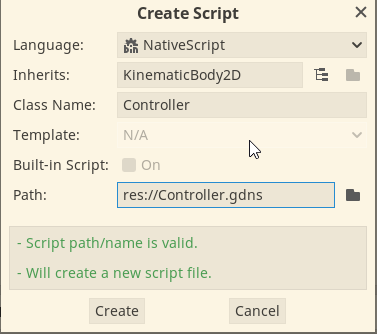
When we create the script, we also need to specify the library interface to use for finding this class. We double-click on the script and in the inspector we can drag and drop our library created in the previous section.
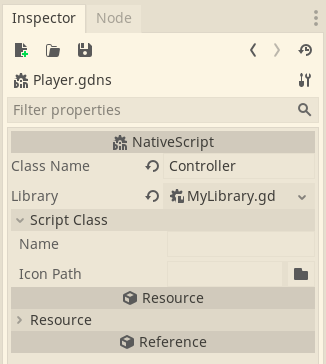
Next, I create a small scene by adding a KinematicBody2D, a collision shape (for the kinematic body), and a sprite. I also drag and drop my new native script on top of the kinematic body.
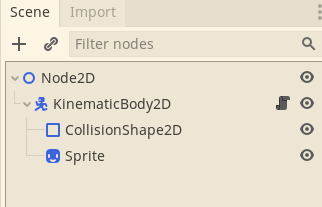
If you followed all the steps up until now you can start the scene and you should be able to control the simple character using the arrow keys.
Porting for web
I am doing a separate section for this as this will be available after the version of Godot 3.3. You can compile and export Godot Native HTML projects. First I really advise you to go and check out my tutorial for porting CMake games for the web using Emscripten. I tested this out with release candidate 6 for the next stable version of Godot.
We need to modify a bit the “CMakeLists.txt” file that is inside the “MyLibrary” folder so that it looks like this:
project(MyLibrary CXX)

set(SOURCES
    src/GodotLibrary.cpp
    include/Controller.h
    src/Controller.cpp
    )

if(EMSCRIPTEN)
    set(CMAKE_C_FLAGS "${CMAKE_C_FLAGS} -s ASSERTIONS=1 -s SIDE_MODULE=1")
    set(CMAKE_CXX_FLAGS "${CMAKE_CXX_FLAGS} -s ASSERTIONS=1 -s SIDE_MODULE=1")
    set(CMAKE_EXECUTABLE_SUFFIX ".wasm")

    add_executable(MyLibrary ${SOURCES})
else()
    add_library(MyLibrary SHARED ${SOURCES})
endif()

target_link_libraries(MyLibrary PUBLIC godot-cpp)

target_include_directories(MyLibrary
                           PUBLIC
                           $<INSTALL_INTERFACE:include>
                           $<BUILD_INTERFACE:${CMAKE_CURRENT_SOURCE_DIR}/include>
                           PRIVATE
                           ${CMAKE_CURRENT_SOURCE_DIR}/src
                           )
Its a bit strange I know but for the current time being WebAssembly’s shared libraries are just executable wasm files. The rest would be to just compile using Emscripten. For the exact compilation details look up the article mentioned in this section.
Conclusion
This is just an introduction to using Godot Native code for your Godot game. You can do so much more in C++ than this of course.
As I mentioned Godot is a an especially good engine to start with. It has better support for small games and 2D games than Unreal and you will have a smaller entry barrier compared to what you have to do to learn Unreal. Given that you want to program in C++ of course.
If you want even more power with C++ and Godot check out the Godot Modules article on this site. And if you want to be able to setup these kinds of CMake projects – check out my course.
Yes, indeed you do have to compile each library. You can look into this docker option for doing so - https://thatonegamedev.com/cpp/cmake/cmake-cross-compiling-using-docker/. And this article about GDNative is now a bit old. If you want to do this for Godot 4 take a look at this one instead - https://thatonegamedev.com/cpp/cmake/gdextesion-cmake-programmer-setup/ & https://thatonegamedev.com/cpp/cmake/godot-4-gdextension-for-c-using-cmake/
Great article! Just what I needed. Thanks! I will try it out soon. I have a question: what if I want to create a multiplatform game? For Android, iOS, web, Win, Mac, Linux. My dll won't work there, I guess. One of the screenshots also suggests that I have to create libraries for all supported platforms myself. Is that so?
Leave a comment