
CI/CD for C/C++ games using GitHub Actions
by Hristo Iliev |
Published on
category CMake
CI/CD is short for – continuous integration and continuous deployment. It is a hot topic all over the tech industry and it is also very relevant for games. GitHub is a major platform for source control management and also provides a very powerful CI/CD process in the form of GitHub Actions which come almost free (limitations are on available build time per month).
In summary, CI is the process of automating your build in a central place. This is done so that you can avoid having the problems of “It works on my machine when I built it” – which is a common mistake because on the developer machine there usually are all the prerequisites installed while they might be missing from your build process. This also eliminates the human error possibility. The third most important bonus is that you can validate that the build is running on different platforms and even run tests on the built game.
Continuous deployment is the process of automatically deploying your builds coming from the CI side on target platforms. In this article, I will give an example of how to publish and patch your itch.io game.
Table of Contents
- Before you start
- What is automation? Why do I need it?
- Build system
- GitHub Actions
- Publish to Itch.io using Butler
- Conclusion
Before you start
Before you start this article you should have some knowledge of:
- Command line / Terminal – You would need to know how you would normally run applications and manage the command line and arguments. I have a good beginner article on the topic.
- Some understanding of Linux will be a bonus – CI/CD is widely used to build for different platforms. I write mostly for Windows users but the examples in this article would mostly tackle Linux build machines as they are more specific.
- How to use Git – I won’t explain what git or source control is so my guess would be that you already know how to initialize a git repository and push data to it.
- Knowledge of the CMake build system – We will be building a C++ project so at least the basic setup and build process using CMake would be the minimum you would need. You can start with the beginner-friendly article on this site.
That being said, this will be a more complicated topic but I will try to simplify every step of it. I won’t get into details about what C++ code we will be compiling as this could be applied to any C++ repository. If you experience problems building on Linux and you are a Windows user, I strongly advise you to first try and build the project locally until you are sure of all the steps and packages that you need to install.
What is automation? Why do I need it?
CI/CD automation is really useful to save you time. Once the process is in place you would be free to work mostly on features and your game will automatically get built for multiple platforms and even published in the correct places. It will also save you from errors that you can create that may affect your team.
When GitHub Actions starts it will spin up a completely new machine with some build tools installed. It will every time start cleanly from the same state, download your projects and run your automation commands. Then it will clean up everything and stop. If any errors occur it will deem the build bad and notify you. If it is successful you have the option to produce results in the form of files. These results are also known as build “artifacts”.
If you’re not sold on that well you can continue to do everything by hand and pull your hairs when errors happen.
Build system
For this example, I consider a project that is built using CMake. It will be the most simple setup where I will only need to specify the source and build the directory from the command line. There will be no CMake installs and I will not get into details of what the project is or what the CMakeLists.txt file contains.
There will be a basic project structure though that you should get familiar with because it will matter for our build scripts. I will use the following project architecture for this example:
- .git
- .github
- workflows
- cmake.yml
- workflows
- build
- … generated build files …
- emsdk
- … files for web builds …
- src
- main.h
- main.cpp
- other.cpp
- CMakeLists.txt
GitHub Actions
First thing is first. You will need to create a simple repository with the CMake build system and commit it into GitHub. Next open the repository page and navigate to the Actions menu.
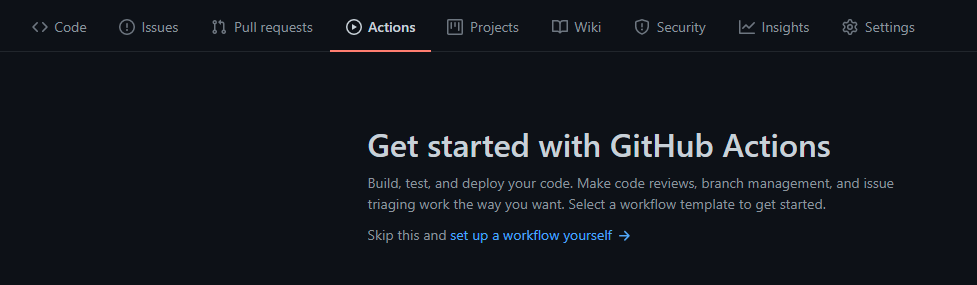
This will be the first time you create an action so you should click on the “set up a workflow yourself ->” link. It will lead you to a new page where you would have an action ready. Rename the file to “cmake.yml” and commit it by clicking on the button “Start commit“.

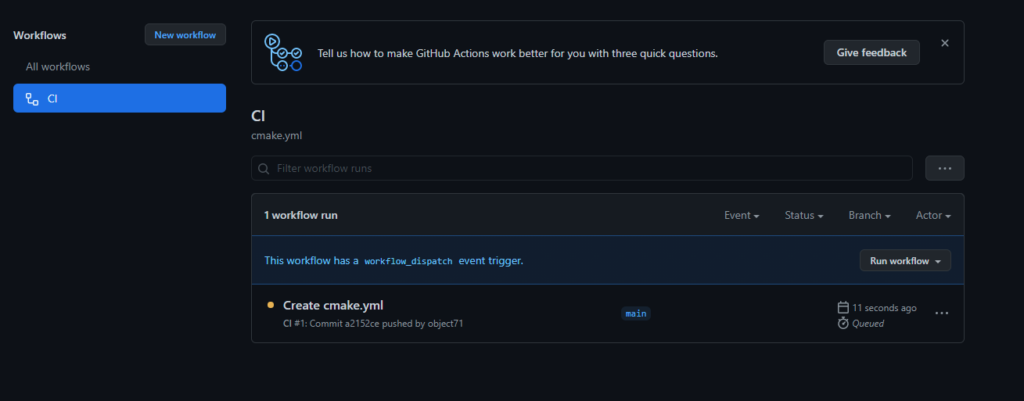
The basic action is like a CI/CD “Hello, World!” example where it will set up the latest ubuntu machine and run an echo to the console. If you navigate to the actions tab now it will be a bit different and will now have your first action either preparing or already successful.
Creating a custom GitHub Action
Okay so we created our first action. Now the next step is to actually make it build our project.
Breakdown of what an Action contains
Before we start customizing it lets break down what is the structure of the action. Actions are written in the YAML language and are sensitive on spacing similar to how python is. I will give you the most basic structure of the action with some descriptions in the comments (starting with #):
# All actions have a name that will be displayed in the "Actions" page in GitHub.
name: CI


# The "on" option will specify when to run this action and on which branch
# Usually for a CI action you would like to run it on every pull request and on push
# For CD you would probably only want to run it on closed pull requests or direct pushes on master
# If you want to run it manually you would add "worflow_dispatch"
on:
  push:
    branches: [ main ]
  pull_request:
    branches: [ main ]
  workflow_dispatch:

# The whole action can contain sub-items called jobs
# Jobs are run separately and will spin up a new build machine for each sub-item
jobs:
  # Under jobs you can put whatever name you want

  # This is just a custom name "build" but it can be anything
  build:
    # What build machine to start

    # For Windows you can go with "windows-latest"
    runs-on: ubuntu-latest

    # Steps are the individual actions for each job
    steps:
      # Checks-out your repository under $GITHUB_WORKSPACE, so your job can access it
      # Usually this is always needed
      - uses: actions/checkout@v2

      # Runs a single command using the runners shell
      - name: Run a one-line script
        run: echo Hello, world!

      # Runs a set of commands using the runners shell
      - name: Run a multi-line script
        run: |
          echo Add other actions to build,
          echo test, and deploy your project.
As you can see it will be mostly straightforward. You define an action. The action has jobs that will run separately. Each job has steps that will run sequentially. Steps are just commands that run in the terminal.
Customizing the pipeline
Let’s say I have a project that I would like to build and deploy to be playable on the web on itch.io. To do this I would need to do a setup to build my project using emscripten. Usually, emscripten would be git-ignored and needs to be installed on every machine before the build. My project will also be OpenGL-based and would require some system libraries for a successful build. I would also like to produce artifacts from the build that I can later use.
We will start with the system packages. To build under Linux we have to have some GUI packages for the X11 windowing system. We also need to install dev libraries for OpenGL and some other useful packages for usage during the build like – zip or python. To do this we will need to run the following commands:
sudo apt-get update -qq
sudo apt-get install -y gcc-multilib python3 curl zip unzip
sudo apt-get install -y --no-install-recommends libx11-dev libxcursor-dev libxrandr-dev libxinerama-dev libxi-dev libxext-dev libxfixes-dev libgl1-mesa-dev
Next, I would need to install and activate emscripten. I usually have the emsdk project committed but it still needs to be installed and activated for usage. To do this We would need the following command lines run inside the emsdk folder:
./emsdk install latest
./emsdk activate latest
The next step is configuring CMake. Configuring for a web build would require me to also specify the emscripten toolchain file. If you want to read more on the subject of how to compile for the web you can check out my article on the subject. The basic command for this would be:
cmake -S . -B build -DCMAKE_BUILD_TYPE=Release -Wno-dev -DCMAKE_TOOLCHAIN_FILE=$GITHUB_WORKSPACE/emsdk/upstream/emscripten/cmake/Modules/Platform/Emscripten.cmakeLast thing for our build would be to run the CMake build command:
cmake --build ./build --config ReleaseCombining all the commands described we already have a clear idea of our first pipeline. Next, we just need to describe it in YAML. Following the above steps we end up with a yaml file much like this one:
name: Release Build

on:
  push:
    branches: [master]
  pull_request:
    branches: [master]
    types: [closed]

jobs:
  release_web:
    name: Web Release
    runs-on: ubuntu-latest

    steps:
      - uses: actions/checkout@v2

      - name: Create Build Directory
        run: cmake -E make_directory ${{github.workspace}}/build

      - name: Install Packages
        run: |
          sudo apt-get update -qq
          sudo apt-get install -y gcc-multilib python3 curl zip unzip
          sudo apt-get install -y --no-install-recommends libx11-dev libxcursor-dev libxrandr-dev libxinerama-dev libxi-dev libxext-dev libxfixes-dev libgl1-mesa-dev

      - name: Configure Emscripten
        shell: bash

        # Change the directory to be emsdk instead of the project root
        working-directory: ${{github.workspace}}/emsdk
        run: |
          ./emsdk install latest
          ./emsdk activate latest

      - name: Configure CMake
        run: cmake -S . -B build -DCMAKE_BUILD_TYPE=Release -Wno-dev -DCMAKE_TOOLCHAIN_FILE=$GITHUB_WORKSPACE/emsdk/upstream/emscripten/cmake/Modules/Platform/Emscripten.cmake

      - name: Build

        run: cmake --build ./build --config Release
This will be enough to create our web build. What you will notice though if you run this pipeline is that the only result you get is wheter the project manages to build under Ubuntu. While useful we would like to follow up with getting the built files from GitHub Actions. To produce an artifact we would need to separate the files that we want in our artifact. Usually, the build system will produce an HTML, JavaScript, and WebAssembly file. We would like to create a folder and copy them over there. Then we run a built-in command that uploads the artifact in GitHub for our use. I will cut this short and give you the direct yaml example:
- name: Create Artifact
  run: |
    mkdir release
    cp build/Main.html release/index.html
    cp build/Main.js release/Main.js
    cp build/Main.wasm release/Main.wasm

- name: Publish Artifact
  uses: actions/upload-artifact@v2
  with:
    name: web-release
    path: release
You will notice that in the process I rename the file Main.html to index.html. I do this because itch.io will later require us to have one index.html file in our artifact.
This is all for the build process of our GitHub Action. Continue to see how we integrate this with itch.io.
Publish to Itch.io using Butler
To publish to itch.io you would need to first create your account and project page. You shouldn’t upload anything to that page just create it. I won’t go through the process of doing that. You would also need to create your API key. The API key is like a password that applications like the official itch publisher app called Butler use. To do so you need to go to the API page in the itch.io settings and create a new key. It will always be visible there if you lose it later.
Next you need to head over to your GitHub repository page and create a secret. To do so go into settings – secrets – new repository secret:
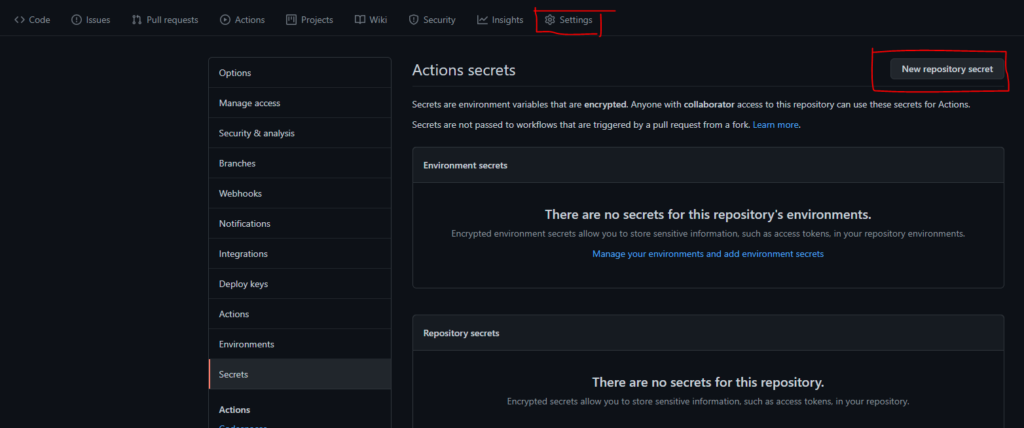
The new secret will have to be called BUTLER_API_KEY and there you need to paste the key you got from your itch.io page.

Next thing is to head back to the yaml file and download butler and publish the package ot itch.io.
- name: Install Butler
        run: |
          curl -L -o butler.zip https://broth.itch.ovh/butler/linux-amd64/LATEST/archive/default
          unzip butler.zip
          chmod +x butler
          ./butler -V

- name: Create release zip and run Butler

        # Here we say that we will use the BUTLER_API_KEY as an environment variable
        env:
          BUTLER_API_KEY: ${{ secrets.BUTLER_API_KEY }}
        run: |
          cd release
          zip -r ../release.zip *
          cd ..

          # Butler will read the API key from the environment variable
          ./butler login
          ./butler push release.zip object71/pong:html5
          ./butler logout
In the butler push command you should replace “object71/pong:html5” with “<your-username>/<your-projectname>:html5”. After a successful run of this pipeline on the project page, you will get your new version of the application. You may need to check the box that says that you want to run this in the browser.
Conclusion
This was a quick and dirty CI/CD for your project. I’ve initially run into a lot of issues and wasted a lot of my free build minutes to understand how the commands work. It will be easier if you first try and build your own project locally on every environment and record each step in the process so that you can then reproduce it as a build step.
As soon as you have one build pipeline it will be a lot easier for you to copy it for every project and it will really save you a lot of time and effort to do this by hand.
This was in no way an exhaustive tutorial on the topic but it covers some of the most common setups.
Leave a comment